Imagine this: It is a freezing January evening in Michigan, or perhaps a sweltering July afternoon in Texas. You are running the heater or the air conditioner, the television is on, and someone is cooking dinner. Suddenly, the house plunges into darkness. You grab a flashlight, trudge down to the basement or the garage, and flip the switch back on. Problem solved, right? Not necessarily. While a tripped breaker is often just doing its job, a breaker that refuses to stay on, feels hot to the touch, or emits a strange odor is a massive red flag. Learning how to identify a faulty circuit breaker is not just a handy DIY skill; it is a critical safety measure that could save your home from a devastating electrical fire.
Every year, electrical malfunctions cause thousands of house fires across the United States, leading to tragic injuries, loss of life, and billions of dollars in property damage. The circuit breaker panel is the beating heart of your home’s electrical system, designed to be the ultimate fail-safe. When it works correctly, it protects your wiring from overheating. When it fails, the consequences can be catastrophic. This comprehensive guide will walk you through everything you need to know about your electrical panel, from understanding how these crucial devices operate to recognizing the subtle and not-so-subtle signs that it is time for a replacement. We’ll also delve into electrical fire safety, common reasons for circuit breaker tripping, and the importance of adhering to the residential electrical code.
Understanding Your Home’s Electrical Guardian: The Circuit Breaker
Before you can diagnose a problem, you need to understand what you are looking at. A circuit breaker is essentially an automatic, resettable switch. Its primary job is to monitor the flow of electricity (measured in Amps) traveling through a specific circuit in your home. If the current exceeds the safe limit that the wires can handle—either due to an overloaded circuit or a short circuit—the breaker “trips,” instantly cutting off the power to prevent the wires from melting and starting a fire. This crucial distinction between a short circuit vs overload is key to understanding why your breaker might trip.
What is a Circuit Breaker?
A circuit breaker is an electrical safety device designed to protect an electrical circuit from damage caused by an overcurrent or short circuit. Its basic function is to interrupt current flow after a fault is detected. Unlike a fuse, which operates once and then must be replaced, a circuit breaker can be reset (either manually or automatically) to resume normal operation.
How Does it Work?
Inside that small plastic casing lies a surprisingly simple yet effective mechanism. Most standard residential breakers use either a bimetallic strip or an electromagnet. In a thermal breaker, the electrical current passes through a bimetallic strip. If too much current flows, the strip heats up and bends, eventually triggering a spring-loaded switch that breaks the connection. In a magnetic breaker, a sudden, massive surge of electricity (like a short circuit) creates a strong magnetic field that pulls the switch open instantly. Many modern breakers combine both technologies for maximum protection.
Types of Circuit Breakers in US Homes
Not all breakers are created equal, and the National Electrical Code (NEC) has evolved significantly over the years to mandate different types of protection for different areas of your home. Understanding these types is crucial for residential electrical code compliance and safety.
•Standard Single-Pole Breakers: These are the most common breakers in your panel, typically rated for 15 or 20 amps. They provide 120 volts of power and are used for general lighting and standard wall outlets throughout your living room, bedrooms, and hallways.
•Standard Double-Pole Breakers: These take up two slots in your panel and provide 240 volts of power. They are rated anywhere from 20 to 60 amps (or more) and are dedicated to heavy-duty appliances like electric water heaters, central air conditioners, electric ranges, and clothes dryers.
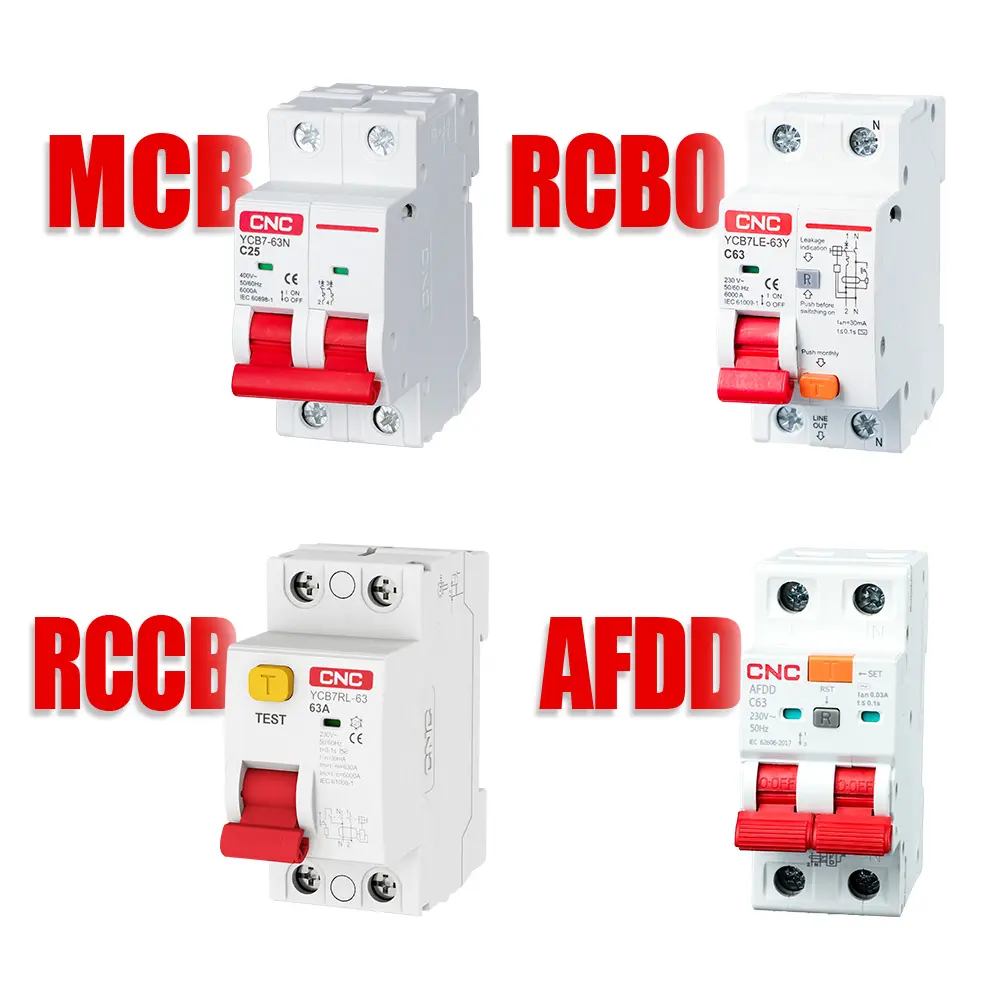
•Ground Fault Circuit Interrupter (GFCI) Breakers: You are probably familiar with GFCI outlets (the ones with the “Test” and “Reset” buttons) found in bathrooms and kitchens. GFCI breakers provide that same protection for an entire circuit. They are designed to detect tiny imbalances in the electrical current—specifically, if electricity is escaping the intended path and potentially traveling through a person or water. They trip in a fraction of a second to prevent fatal electrocution.
•Arc Fault Circuit Interrupter (AFCI) Breakers: While GFCIs protect against shocks, AFCIs protect against fires. They contain tiny computers that constantly monitor the electrical waveform. If they detect the specific, erratic signature of an electrical arc (a spark jumping between loose wires or damaged insulation), they trip the circuit. The NEC now requires AFCI protection for almost all living areas in new home construction.
Why Do Circuit Breakers Fail?
Circuit breakers are durable, but they are mechanical devices, and like all mechanical devices, they have a lifespan. Most experts agree that a high-quality breaker can last 30 to 40 years, but several factors can cause them to fail prematurely.
Age is the most common culprit. Over decades of use, the internal springs can weaken, and the contacts can become pitted or corroded. A breaker that has tripped dozens of times over its life will wear out faster than one that has never tripped. Furthermore, constant exposure to high humidity, extreme temperature fluctuations (common if your panel is in an uninsulated garage), or power surges from lightning strikes can degrade the internal components. Finally, manufacturing defects, while rare, do happen. Certain older brands, such as Federal Pacific Electric (FPE) and Zinsco, are notorious for failing to trip when they should and are considered major fire hazards that should be replaced immediately. Understanding these failure points is key to knowing how to identify a faulty circuit breaker.
The Early Warning Signs: Visual, Auditory, and Olfactory Clues
You do not need to be a master electrician to spot a failing breaker. Often, your senses of sight, sound, and smell are your best diagnostic tools. If you notice any of the following signs, it is time to investigate further or call a professional.
Visual Indicators of Trouble
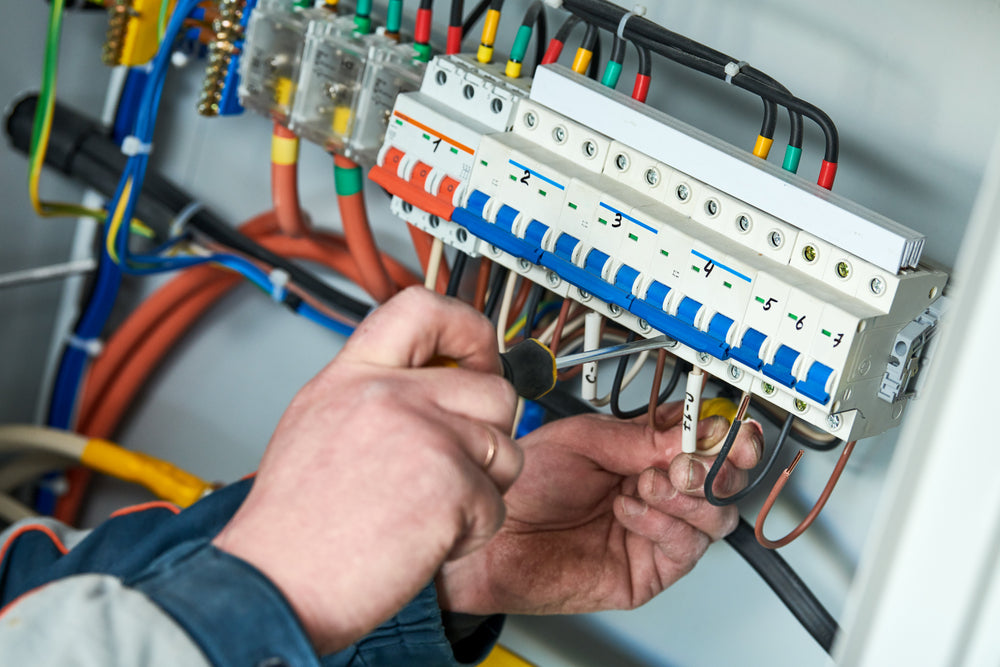
The first step in how to identify a faulty circuit breaker is a thorough visual inspection of your electrical panel. Crucial Safety Note: Never remove the dead front cover (the metal plate surrounding the breakers) unless you are experienced and have turned off the main breaker. Even then, the main lugs remain live and deadly. For a basic visual check, just open the panel door.
•Burn Marks or Discoloration: This is the most alarming visual sign. Look closely at the plastic casing of the breakers and the metal panel itself. If you see black soot, brown scorch marks, or any signs of melting plastic, you have a severe problem. This indicates that extreme heat is being generated, likely due to a loose connection or a breaker that is failing to trip during an overload. This is a direct indicator of potential electrical fire safety risks.
•A Breaker That Won’t Stay Reset: We have all experienced a tripped breaker. The standard procedure is to turn off a few appliances, flip the breaker firmly to the “Off” position, and then back to “On.” However, if the breaker immediately snaps back to the tripped position, or if it feels “spongy” and refuses to click solidly into the “On” position, the internal mechanism is likely broken. Do not try to force it or tape it in the “On” position; this defeats its safety purpose entirely. This is a classic sign of persistent circuit breaker tripping issues.
•Visible Rust or Corrosion: If your electrical panel is located in a damp basement or a humid garage, moisture can seep in. Rust on the metal components or a white, powdery corrosion on the breaker switches indicates water damage. Corrosion increases electrical resistance, which generates heat and can prevent the breaker from tripping when necessary.
Auditory and Olfactory Warnings
Electricity should be silent and odorless. If your electrical panel is making noise or emitting smells, it is crying out for help.
•Buzzing, Humming, or Hissing Sounds: A very faint hum from a heavily loaded panel can sometimes be normal, but a loud, distinct buzzing or hissing sound is a major warning sign. This sound is often caused by an electrical arc—electricity jumping across a small gap due to a loose connection or a failing breaker contact. Arcing generates tremendous heat and is a leading cause of electrical fires.
•Clicking Sounds: If you hear a clicking sound coming from the panel, but no breakers are actually tripping, it could indicate a loose connection or a breaker that is struggling to maintain contact.
•The Smell of Burning Plastic: This is an emergency. If you open your panel door and are hit with the acrid smell of burning plastic, melting wire insulation, or a distinct “electrical” odor (often described as smelling like ozone or fish), turn off the main breaker immediately and call an electrician. This means components are actively melting, and a fire could be imminent. This is a critical electrical fire safety warning.
Environmental Indicators in Your Home
Sometimes, the signs of a faulty breaker manifest outside the panel box, affecting the performance of your home’s electrical system.
•Flickering or Dimming Lights: If the lights in a specific room flicker or dim when you turn on a high-draw appliance (like a vacuum cleaner or a microwave), it could mean the circuit is overloaded. However, if the flickering happens randomly, or if it affects the whole house, it could point to a failing breaker or a loose connection at the panel.
•Frequent, Unexplained Tripping: If a breaker trips every time you run the toaster and the coffee maker simultaneously, you have an overloaded circuit. But if a breaker trips when there is barely any load on it—say, just a few LED lights and a television—the breaker itself has likely become overly sensitive and is failing. This is a clear sign of persistent circuit breaker tripping.
•Appliances Not Receiving Full Power: If your microwave seems to take twice as long to heat food, or if your dryer isn’t getting hot enough, it might not be the appliance’s fault. A failing breaker or a loose connection can cause a voltage drop, preventing your appliances from receiving the power they need to operate efficiently.
Beyond the Obvious: Testing for a Faulty Circuit Breaker
While visual and auditory cues are excellent starting points, sometimes a faulty breaker can be more subtle. For the DIY-savvy homeowner, there are additional steps you can take to confirm your suspicions. However, it is paramount to remember that electricity is dangerous. If you are ever unsure, always err on the side of caution and call a licensed electrician.
Safety First: Essential Precautions
Before you even think about touching your electrical panel for testing, you must understand and implement these critical safety measures. These precautions are fundamental to electrical fire safety and personal protection.
1.Turn Off the Main Power: This is non-negotiable. Locate your home’s main breaker (usually a large, double-pole breaker at the top of your panel, often labeled “Main”). Flip it to the “Off” position. You can also consider a full electrical panel upgrade if your current one is outdated. This will de-energize your entire home. Confirm this by trying to turn on a light or appliance. Warning: Even with the main breaker off, the large service wires entering the top of your panel (the main lugs) are still live and carry lethal voltage. Never touch them.
2.Use Insulated Tools: If you are working inside the panel, use tools with insulated handles. This provides an extra layer of protection against accidental contact with live parts.
3.Wear Personal Protective Equipment (PPE): Safety glasses are a must to protect your eyes from sparks or debris. Insulated gloves can also provide an additional barrier.
4.Work in a Dry Environment: Never work on your electrical panel if you are standing in water or if your hands are wet.
5.Inform Others: Let family members know you are working on the electrical system and that the power will be off. Place a note on the main breaker to prevent accidental re-energizing.
Basic Troubleshooting Steps
Before reaching for a multimeter, try these simpler diagnostic steps to understand how to identify a faulty circuit breaker.
•Resetting a Tripped Breaker (Correct Procedure): If a breaker has tripped, do not just flip it back to “On.” First, move the breaker firmly to the full “Off” position. You should feel a distinct click. Then, push it firmly back to the “On” position. If it immediately trips again, or if it feels loose and does not stay in the “On” position, it is a strong indicator of a fault.
•Isolating the Problem: If a specific circuit keeps tripping, try to identify all the devices and outlets on that circuit. Unplug everything connected to that circuit, then try to reset the breaker. If it holds, plug in devices one by one until the breaker trips again. This helps pinpoint the problematic appliance. If the breaker still trips with nothing plugged in, the issue is likely with the wiring or the breaker itself. This helps differentiate between a short circuit vs overload.
Using a Multimeter (For the DIY-Savvy)
A multimeter is an invaluable tool for diagnosing electrical issues. It can measure voltage, current, and continuity. For testing circuit breakers, you will primarily use the voltage and continuity functions.
How to Safely Use a Multimeter:
1.Set the Dial: For measuring household AC voltage, set your multimeter to AC Volts (V~ or VAC) and choose a range higher than 240V (e.g., 600V).
2.Connect Leads: Plug the black lead into the “COM” (common) jack and the red lead into the “VΩmA” (voltage, ohms, milliamps) jack.
3.Test the Multimeter: Before testing your panel, test the multimeter on a known live outlet to ensure it is working correctly and reading accurately (should read around 120V).
Testing for Voltage at the Breaker (with Main Power ON – EXTREME CAUTION!):
•This test should only be performed by those comfortable and experienced working with live electricity. If you are not, skip this step and call a professional.
1.With the main breaker ON, carefully remove the dead front cover of your electrical panel (if you are qualified and comfortable doing so). If not, you can often test from the screws on the breaker itself, but this is less reliable.
2.Place the black probe of your multimeter on the neutral bus bar (the silver bar with white wires connected).
3.Carefully touch the red probe to the screw terminal of the breaker you want to test. A working 120V breaker should read approximately 120V. A 240V breaker should read 240V when testing between its two terminals, and 120V from each terminal to the neutral bus bar.
4.If a breaker reads 0V when it should be live, it is likely faulty or has tripped internally.
Testing for Continuity (with Main Power OFF):
•This test determines if the internal contacts of the breaker are making a complete circuit when it is in the “On” position. This is a safer test as the main power is OFF.
1.Turn OFF the Main Breaker.
2.Remove the Faulty Breaker: Carefully unclip the suspected faulty breaker from the bus bar. This usually involves pulling it outwards from the bus bar and then unhooking it from the panel rail.
3.Set Multimeter to Continuity: Set your multimeter to the continuity setting (often indicated by a diode symbol or a speaker icon). When the probes touch, it should beep or show a very low resistance reading.
4.Test the Breaker: With the breaker in the “On” position, place one probe on the line side terminal (where the wire from the panel connects) and the other probe on the load side terminal (where the wire to the circuit connects). A good breaker should show continuity (beep or low resistance). If it shows no continuity (open circuit), the breaker is faulty.
5.Repeat the test with the breaker in the “Off” position. It should show no continuity.
Thermal Imaging (Advanced DIY/Professional)
For those with access to more advanced tools, a thermal imaging camera can be incredibly useful. These cameras detect heat signatures. A loose connection or an overloaded, failing breaker will generate excessive heat, which will show up as a hot spot on the thermal image. This allows for non-invasive and highly accurate diagnosis of potential problems before they become critical.
When to Call a Professional Electrician
Knowing your limits is as important as knowing how to identify a faulty circuit breaker. There are several situations where calling a licensed electrician is not just recommended, but essential:
•Any Sign of Burning: If you see scorch marks, smell burning, or hear arcing sounds, turn off your main breaker and call an electrician immediately. This is an emergency, and a clear sign of a potential electrical fire safety issue.
•Repeated Tripping After Troubleshooting: If a breaker continues to trip even after you have unplugged all devices on the circuit, the problem is likely within the wiring or the breaker itself, requiring professional diagnosis. This is a common circuit breaker tripping scenario.
•Old or Damaged Panel: If your electrical panel is old (e.g., Federal Pacific Electric, Zinsco, or simply pre-1980s) or shows signs of significant rust, corrosion, or damage, it is time for a professional inspection and likely an electrical panel upgrade.
•Uncertainty or Discomfort: If at any point you feel unsure, uncomfortable, or out of your depth, do not hesitate to call a professional. Your safety and the safety of your home are paramount.
•Complex Wiring Issues: If you suspect a short circuit within your walls, or if multiple circuits are affected, a professional electrician has the tools and expertise to diagnose and repair complex wiring problems safely.
•New Installations or Upgrades: Any new circuit installations, panel upgrades, or major electrical work should always be performed by a licensed professional to ensure compliance with local codes and safety standards, especially the residential electrical code.
Remember, a licensed electrician has the training, experience, and insurance to handle electrical work safely and correctly. Attempting complex electrical repairs without proper knowledge can lead to serious injury, fire, or damage to your home, and may even void your home insurance policy.
Delving Deeper: Brands, Modern Demands, and Preventative Care
Beyond the immediate signs of trouble, understanding the landscape of circuit breaker manufacturers, the demands of modern electrical loads, and proactive maintenance can significantly enhance your ability to safeguard your home.
The Good, The Bad, and The Outdated: Circuit Breaker Brands in the US
When it comes to circuit breakers, not all brands are created equal. The US market is dominated by a few major players known for their reliability and adherence to safety standards. However, there are also older, notorious brands that pose significant risks and should be identified and replaced.
Leading Brands You Can Trust:
•Square D (Schneider Electric): Widely considered a top-tier brand, Square D (especially their QO and Homeline series) is known for its robust construction, reliability, and broad availability. Many electricians prefer Square D for new installations and electrical panel upgrade projects.
•Eaton (formerly Cutler-Hammer): Another highly respected manufacturer, Eaton produces a wide range of circuit breakers, including their BR and CH series. They are known for quality and innovation, often found in both residential and commercial applications.
•Siemens: A global leader in electrical products, Siemens offers reliable and high-performance circuit breakers. Their panels and breakers are common in many US homes and are generally considered a safe and dependable choice.
•General Electric (GE): GE has a long history in the electrical industry, and their circuit breakers are still found in many homes. While generally reliable, some older GE panels might be less common for new installations today compared to Square D or Eaton.
Notorious Brands: A Safety Hazard You Must Address:
If your home has an electrical panel from one of these manufacturers, it is strongly recommended to have it inspected by a qualified electrician immediately. These brands are infamous for design flaws that can prevent breakers from tripping when they should, leading to a high risk of fire. This is a critical aspect of electrical fire safety.
•Federal Pacific Electric (FPE) Stab-Lok Panels: These panels, installed in millions of homes from the 1950s to the 1980s, are perhaps the most dangerous. Studies have shown that FPE Stab-Lok breakers have a high failure rate, often failing to trip under overload or short-circuit conditions. This means they offer little to no protection against electrical fires. If you have an FPE Stab-Lok panel, a full panel replacement is typically the only safe solution.
•Zinsco Panels: Similar to FPE, Zinsco panels (and their Sylvania-Zinsco counterparts) are another known fire hazard. Their aluminum bus bars are prone to corrosion and poor connections, leading to overheating and a high risk of fire. Like FPE, Zinsco panels usually require complete replacement.
•Challenger Panels: While not as universally condemned as FPE or Zinsco, some Challenger panels from the 1980s and 1990s have been associated with issues, particularly with certain types of breakers that can overheat. An inspection by an electrician is advisable if you have a Challenger panel.
Identifying your panel brand is usually straightforward; the manufacturer’s name is typically printed prominently on the inside of the panel door or on the main breaker itself. If you discover you have one of these problematic brands, do not delay in seeking professional advice.
Modern Demands: How New Technologies Impact Your Circuit Breakers
Our homes are more electrified than ever before. From smart home devices to electric vehicle chargers, the demands on our electrical systems are constantly increasing. These modern loads can put additional stress on your circuit breakers and panel. Understanding these new demands is part of knowing how to identify a faulty circuit breaker that might be struggling.
•Smart Home Devices: While individual smart plugs or light bulbs draw minimal power, a house full of interconnected smart devices, especially those with high-power components like smart appliances or advanced entertainment systems, can collectively increase the baseline load on your circuits. Ensure your circuits are adequately sized for these cumulative loads.
•Electric Vehicle (EV) Chargers: This is one of the most significant new demands on residential electrical systems. Level 2 EV chargers typically require a dedicated 240-volt circuit, often with a 40-amp or 50-amp breaker. This is a substantial load that older panels may not be designed to handle. Installing an EV charger often necessitates a panel upgrade or at least a careful assessment of your existing electrical service capacity.
•Solar Panel Installations: Homes with solar panels often require specialized breakers and sometimes a main panel upgrade to accommodate the bidirectional flow of electricity and the additional safety requirements for grid-tied systems. These installations must always be handled by electricians experienced in solar integration.
•Home Offices and Workshops: With more people working from home, dedicated home offices with multiple computers, monitors, printers, and other electronics can easily overload standard 15-amp circuits. Similarly, workshops with power tools can draw significant current. If you frequently trip breakers in these areas, it is a sign that the circuit is undersized for its current use.
•The Rise of Smart Breakers: Just as homes are getting smarter, so are circuit breakers. Some manufacturers now offer “smart breakers” that can communicate with your home network. These advanced devices can provide real-time energy monitoring, allow you to remotely trip or reset breakers via an app, and offer more granular diagnostics about power consumption and potential issues. While still a niche market, smart breakers represent the future of home electrical protection.
Proactive Protection: Preventative Maintenance Tips for Your Electrical Panel
An ounce of prevention is worth a pound of cure, especially when it comes to your home’s electrical system. Regular, simple preventative maintenance can extend the life of your circuit breakers, prevent costly repairs, and most importantly, enhance your home’s safety. Adhering to these tips can help you avoid common circuit breaker tripping issues.
1.Annual Visual Inspection: Once a year, open your electrical panel door and perform a quick visual check. Look for any of the visual signs of trouble discussed earlier: discoloration, burn marks, rust, or loose wires. Ensure all breakers are seated firmly in their slots. If you see anything concerning, call an electrician.
2.Test GFCI and AFCI Breakers Monthly: GFCI and AFCI breakers have a “Test” button. Press it monthly to ensure they are functioning correctly. The breaker should trip immediately. If it does not, it needs to be replaced. Remember to reset it after testing.
3.Keep the Area Around the Panel Clear: The NEC requires a minimum of 3 feet of clear space in front of your electrical panel. This is not just for access during emergencies but also for proper ventilation. Storing boxes or other items in front of the panel can restrict airflow, leading to heat buildup, and can impede quick access in an emergency.
4.Label Your Circuits Clearly: While not strictly preventative maintenance, clear and accurate labeling of each circuit breaker is invaluable for troubleshooting. If you know exactly what each breaker controls, you can quickly identify and isolate problems. Take the time to map out your circuits if they are not already clearly labeled.
5.Avoid Overloading Circuits: Be mindful of the electrical load on each circuit. If you consistently trip a breaker, it is a sign of an overloaded circuit. Instead of just resetting it, consider redistributing appliances to other circuits or consulting an electrician about adding a new dedicated circuit. This helps manage the short circuit vs overload distinction.
6.Address Moisture Issues: If your panel is in a damp basement or garage, address the source of the moisture. High humidity and water exposure can lead to corrosion and significantly shorten the lifespan of your electrical components.
7.Consider a Whole-House Surge Protector: While circuit breakers protect against overcurrents, they do not always protect against voltage surges (like those from lightning strikes). A whole-house surge protector, installed at your main electrical panel, can safeguard all your home’s electronics from damaging power surges.
8.Professional Panel Inspection Every 5-10 Years: Even if you are diligent with your DIY checks, a professional electrician can perform a more thorough inspection. They can check internal connections, torque screws to proper specifications, identify potential hazards you might miss, and assess the overall health of your electrical system. This is especially important for older homes or if you are planning major electrical upgrades, ensuring compliance with the residential electrical code.
The Cost of Neglect: Why Timely Replacement Matters
Ignoring a faulty circuit breaker is like ignoring a ticking time bomb in your home. The potential consequences far outweigh the cost and inconvenience of a timely repair or replacement. Understanding these risks can motivate you to act quickly when you suspect a problem. This section highlights crucial aspects of electrical fire safety.
Dangers of Ignoring a Faulty Breaker
1.Electrical Fires: This is the most severe and common danger. A breaker that fails to trip during an overload or short circuit allows excessive current to flow through the wiring. This can cause the wires to overheat, melt their insulation, and ignite surrounding combustible materials like wood framing or insulation. According to the National Fire Protection Association (NFPA), electrical distribution or lighting equipment was involved in an estimated average of 34,000 home fires per year in the U.S. from 2015-2019, resulting in 470 civilian deaths, 1,120 civilian injuries, and $1.3 billion in direct property damage . Many of these fires could be prevented by properly functioning circuit breakers.
2.Electrocution and Shock Hazards: A faulty breaker, especially a GFCI or AFCI that is not functioning correctly, can fail to protect against ground faults or arc faults, increasing the risk of severe electrical shocks or electrocution to occupants.
3.Damage to Appliances and Electronics: Unregulated power surges or inconsistent voltage due to a failing breaker can fry sensitive electronics and damage expensive appliances, leading to costly repairs or replacements.
4.Voided Home Insurance: In some cases, if an electrical fire is traced back to a known, unaddressed electrical issue (like a faulty breaker you were aware of but ignored), your home insurance policy might deny your claim.
Average Cost of Circuit Breaker Replacement in the US
The cost to replace a circuit breaker in the United States can vary significantly based on several factors, including the type of breaker, the complexity of the job, your geographical location, and whether you hire a professional. As of early 2024, here’s a general breakdown:
| Breaker Type | Average Cost (Parts Only) | Average Cost (Installed by Professional) |
| Standard Single-Pole (15-20 Amp) | $10 – $20 | $75 – $150 |
| Standard Double-Pole (30-60 Amp) | $20 – $50 | $100 – $250 |
| GFCI Breaker | $40 – $100 | $150 – $300 |
| AFCI Breaker | $50 – $150 | $175 – $350 |
| Main Breaker (100-200 Amp) | $100 – $250 | $200 – $500 |
Note: These are average estimates. Labor costs typically range from $75 to $150 per hour for electricians. If the job requires significant troubleshooting, panel upgrades, or permits, the total cost will be higher.
DIY vs. Professional Replacement
DIY Replacement:
•Pros: Can save on labor costs, provides a sense of accomplishment.
•Cons: High risk of electrocution or fire if done incorrectly. Requires specialized knowledge, tools, and strict adherence to safety protocols. May violate local electrical codes or void home insurance if not performed by a licensed professional. Only recommended for experienced individuals replacing a standard breaker with an identical one after confirming the main power is off.
Professional Replacement:
•Pros: Safety is ensured, work is up to code, often comes with a warranty. Electricians can diagnose underlying issues, handle permits, and ensure proper installation. Reduces liability and ensures home insurance remains valid.
•Cons: Higher upfront cost due to labor fees.
For anything beyond a simple, like-for-like replacement of a standard breaker, or if you have any doubts about your ability to perform the task safely, always hire a licensed and insured electrician. This is crucial for adhering to the residential electrical code.
Preventing Future Issues
1.Do Not Overload Circuits: Be mindful of how many high-draw appliances you are running on a single circuit. If a breaker trips frequently, it is a sign of an overloaded circuit, not necessarily a faulty breaker. Consider redistributing appliances or having a new circuit installed. This helps prevent circuit breaker tripping.
2.Regular Inspections: Periodically (once a year) open your electrical panel door and perform a visual and auditory inspection. Look for any signs of burning, listen for buzzing, and ensure all breakers are firmly in place.
3.Keep the Panel Clear: Do not store items in front of or around your electrical panel. It needs clear access for ventilation and emergency access.
4.Label Your Circuits Clearly: While not strictly preventative maintenance, clear and accurate labeling of each circuit breaker is invaluable for troubleshooting. If you know exactly what each breaker controls, you can quickly identify and isolate problems. Take the time to map out your circuits if they are not already clearly labeled.
5.Avoid Overloading Circuits: Be mindful of the electrical load on each circuit. If you consistently trip a breaker, it is a sign of an overloaded circuit. Instead of just resetting it, consider redistributing appliances to other circuits or consulting an electrician about adding a new dedicated circuit.
6.Address Moisture Issues: If your panel is in a damp basement or garage, address the source of the moisture. High humidity and water exposure can lead to corrosion and significantly shorten the lifespan of your electrical components.
7.Consider a Whole-House Surge Protector: While circuit breakers protect against overcurrents, they do not always protect against voltage surges (like those from lightning strikes). A whole-house surge protector, installed at your main electrical panel, can safeguard all your home’s electronics from damaging power surges.
8.Professional Panel Inspection Every 5-10 Years: Even if you are diligent with your DIY checks, a professional electrician can perform a more thorough inspection. They can check internal connections, torque screws to proper specifications, identify potential hazards you might miss, and assess the overall health of your electrical system. This is especially important for older homes or if you are planning major electrical panel upgrade projects.
Frequently Asked Questions (FAQ)
Here are some common questions homeowners have about circuit breakers, often related to how to identify a faulty circuit breaker and electrical fire safety:
Q: Can I replace a circuit breaker myself?
A: While it is technically possible for an experienced DIYer to replace a standard breaker, it is generally not recommended due to the inherent dangers of working with electricity. Improper installation can lead to fire, electrocution, or damage to your electrical system. Always consult local codes and consider hiring a licensed electrician to ensure compliance with the residential electrical code.
Q: How long do circuit breakers last?
A: Most modern circuit breakers are designed to last 30 to 40 years. However, factors like frequent tripping, exposure to moisture, and manufacturing defects can shorten their lifespan. Older breakers (40+ years) should be inspected regularly.
Q: What causes a circuit breaker to trip repeatedly?
A: The most common causes are an overloaded circuit (too many devices drawing power), a short circuit (a hot wire touching a neutral wire or ground), or a ground fault (electricity escaping the circuit, often through water or a person). Less commonly, a faulty breaker itself can cause repeated tripping. Understanding the difference between a short circuit vs overload is crucial here.
Q: Is a warm circuit breaker normal?
A: A slightly warm circuit breaker can be normal, especially if it is carrying a heavy load. However, a hot breaker, one that is hot to the touch, or one that has visible scorch marks, is a sign of a serious problem (overload, loose connection, or internal fault) and requires immediate attention.
Q: What is the difference between a GFCI and an AFCI breaker?
A: A GFCI (Ground Fault Circuit Interrupter) protects against electrical shock by detecting imbalances in current flow. An AFCI (Arc Fault Circuit Interrupter) protects against electrical fires by detecting dangerous electrical arcs. Both are crucial safety devices, often required in different areas of modern homes by electrical codes.
Conclusion
Your home’s electrical system is a complex network, and the circuit breakers are its frontline defenders against disaster. Learning how to identify a faulty circuit breaker is a vital skill for any homeowner, empowering you to recognize potential hazards and take appropriate action. Whether it is a subtle burning smell, frequent circuit breaker tripping, or visible scorch marks, paying attention to these warning signs can prevent catastrophic outcomes and ensure electrical fire safety.
Remember, while some basic troubleshooting can be done by the DIY enthusiast, electrical work carries significant risks. When in doubt, or for any complex repairs or replacements, always prioritize safety and call a licensed professional. Protecting your home and family from electrical hazards is a responsibility that should never be taken lightly. Act quickly, stay safe, and ensure your home’s electrical guardian is always in top working condition, in compliance with the residential electrical code.