
Written by a Licensed Electrician with 15+ Years in the Field
Let me be straight with you right from the start. I’ve been wiring homes across the Midwest and East Coast for over fifteen years, and if there’s one thing I’ve learned, it’s this: you don’t need a fancy drop ceiling to get beautiful, functional lighting in your home. I’ve lost count of how many homeowners have told me they thought recessed can lights and that sleek, built-in look were only possible if they spent thousands on a false ceiling installation. That’s just not true.
Surface light installation without false ceiling work is not only possible—it’s often the smarter choice. I’ve installed surface-mounted fixtures in hundreds of homes, from century-old Victorians in Boston with solid plaster ceilings to modern condos in Chicago with exposed concrete overhead. Each job teaches you something new, and I’m going to share every bit of that knowledge with you in this guide.
Whether you’re renovating your living room, updating your kitchen, or trying to brighten up a basement that feels like a cave, this article will walk you through everything you need to know. No fluff, no technical jargon you can’t understand, just practical advice from someone who’s actually done this work day in and day out.
What Is Surface Light Installation Without False Ceiling, and Why Should You Care?
Let’s start with the basics. When we talk about surface light installation without false ceiling, we’re referring to mounting lighting fixtures directly onto your existing ceiling surface—whether that’s drywall, plaster, concrete, wood, or even an exposed joist ceiling in a basement or loft. There’s no need to build a secondary ceiling layer beneath your existing one, no need to lose precious headroom, and no need to spend a fortune on materials and labor.
The fixtures themselves sit on the surface rather than being recessed into it. That might sound like a compromise at first, but modern surface-mounted lights have come a long way from the bulky, ugly fixtures your grandparents had. Today’s surface-mounted LED panels, for instance, are often less than an inch thick and look incredibly sleek . I’ve had clients tell me they actually prefer the look of a well-chosen surface fixture over recessed lighting because it adds a deliberate design element rather than disappearing into the ceiling.
Here’s the reality: a false ceiling (also called a drop ceiling or suspended ceiling) typically costs between $8 and $24 per square foot to install, depending on materials and labor rates in your area. For an average living room of 200 square feet, you’re looking at $1,600 to $4,800 just for the ceiling structure before you even buy a single light fixture. Then you still need to buy and install the actual lights. When you choose surface light installation without false ceiling, you eliminate that entire expense.
But cost isn’t the only factor. In older homes—and I’ve worked in plenty of them—the original ceilings are part of the character. That ornate plaster crown molding in a 1920s bungalow? That exposed beam ceiling in a converted warehouse apartment? You don’t want to cover that up with a drop ceiling. Surface mounting lets you keep what makes your space unique while still getting the lighting you need.
Types of Surface-Mounted Lights You Can Install Without a False Ceiling
Over the years, I’ve seen the market for surface-mounted lighting explode with options. When I started in this trade, your choices were basically limited to flush-mount dome lights and surface fluorescent fixtures that looked like they belonged in a hospital. Now? The variety is incredible, and I want to break down the main categories so you can make an informed decision.
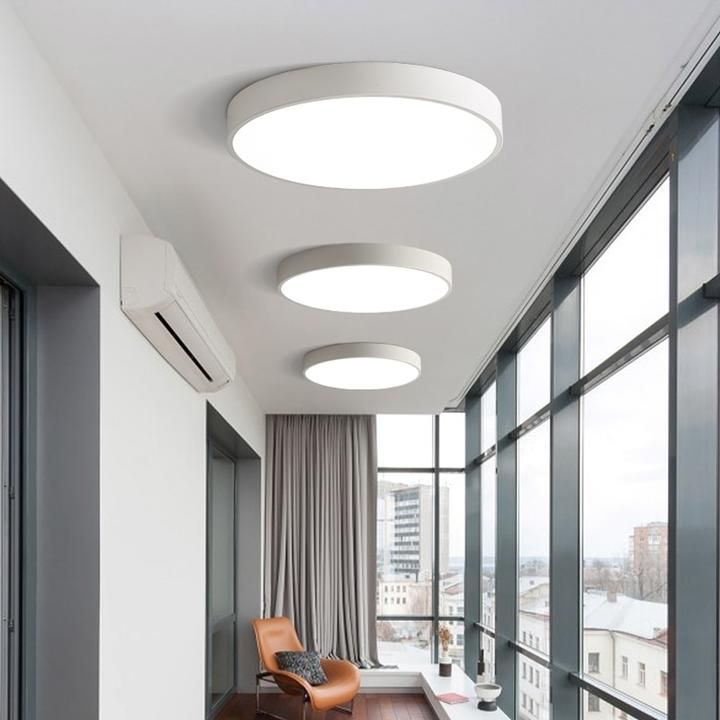
Surface-Mounted LED Panel Lights
These are my go-to recommendation for most residential applications, and here’s why: they’re thin, they’re bright, they’re energy-efficient, and they look modern without trying too hard. A typical surface-mounted LED panel is a flat, square or rectangular fixture that mounts directly to your ceiling with a simple bracket system .
The panel itself is usually less than an inch thick, which means it doesn’t visually weigh down the room. The light output is diffused across the entire surface, so you don’t get that harsh spotlight effect you might remember from older fixtures. In terms of wattage, I typically recommend an 18W to 24W panel for a medium-sized bedroom or kitchen, and 36W panels for larger open-concept living areas .
What I really like about these for surface light installation without false ceiling is how clean the installation looks. The mounting bracket attaches to the ceiling with a few screws, the wiring connects in a junction box, and then the panel clips or screws onto the bracket. From below, you see a slim, modern fixture that appears to float just slightly below the ceiling surface. No bulky housing, no visible hardware, no mess.
I’ve installed these in everything from basement apartments to high-end kitchen renovations, and they consistently deliver. The even light distribution means fewer shadows, which is especially important in kitchens where you’re working with sharp knives and hot pans.
Semi-Flush Mount Ceiling Lights
Semi-flush mounts occupy that sweet spot between a true flush mount (which sits right against the ceiling) and a pendant light (which hangs down significantly). They typically extend 4 to 8 inches below the ceiling surface, which gives them a bit more presence and style than a flat panel while still keeping plenty of headroom clearance .
These are fantastic for rooms with standard 8-foot ceilings where a pendant might feel too low, but a flush mount feels too plain. I’ve used semi-flush mounts in dining rooms, entryways, and bedrooms where the homeowner wants something with a bit more decorative character. You can find them in every style imaginable—industrial cage designs, mid-century modern globes, farmhouse-inspired fixtures with fabric shades, and sleek contemporary metal designs.
The installation process is straightforward: a mounting strap attaches to the ceiling box, the fixture canopy covers the box, and the shade or body hangs down from there. Because they don’t require any ceiling modification, semi-flush mounts are perfect for surface light installation without false ceiling.
Surface-Mounted Downlights (Cylinder Lights)
These are one of my favorite solutions for homeowners who love the look of recessed can lights but don’t want to cut holes in their ceiling. A surface-mounted downlight looks like a small cylinder or disc that mounts directly to the ceiling surface. The light shines downward, just like a recessed can, but the fixture body sits on top of the ceiling rather than inside it .
I’ve used these extensively in commercial spaces—coffee shops, retail stores, office lobbies—but they’re increasingly popular in residential settings too. A grid of surface-mounted downlights across a living room ceiling gives you that contemporary, gallery-like lighting effect without any ceiling demolition.
The key with these is spacing. I typically place them 3 to 4 feet apart in a grid pattern for even ambient lighting . In a kitchen, I might use them to supplement under-cabinet task lighting. In a hallway, a straight line of cylinder downlights creates a clean, modern runway effect that draws the eye forward.
Track Lighting Systems
Track lighting gets a bad rap from people who remember the clunky, dated systems from the 1980s. Modern track lighting is a completely different animal. Today’s tracks are slim, the heads are stylish and compact, and the flexibility is unmatched .
With track lighting, you mount a single electrical track to the ceiling surface, and then you can position individual light heads anywhere along that track. Need to highlight a piece of art? Move a head. Want to adjust the lighting for a dinner party? Reposition a few heads. Adding a new furniture layout? Slide the lights to match.
For surface light installation without false ceiling, track systems are ideal because all the wiring runs inside the track itself. You only need one electrical connection point, and the track can run across the ceiling to wherever you need light. I’ve installed curved tracks, zigzag patterns, and even circular tracks for clients who wanted something truly unique .
In my experience, track lighting works best in spaces where flexibility matters—home offices, studios, open-concept living areas, and rooms where the furniture arrangement changes frequently. It’s also great for highlighting architectural features or artwork without committing to fixed fixture positions.
LED Strip and Profile Lighting
This is where things get really interesting, and it’s an area where I’ve done some of my favorite work. LED strip lighting involves flexible strips of tiny LED diodes that you can mount inside aluminum channels (called profiles) and attach to walls or ceilings .
For surface light installation without false ceiling, my favorite application is what I call the “floating crown” effect. You mount an L-shaped aluminum LED profile 6 to 10 inches below the ceiling line, running it along the top of the walls. The LED strip sits inside the profile, shining upward toward the ceiling. The light reflects off the ceiling surface and washes back down into the room, creating a soft, indirect glow that looks incredibly high-end .
I’ve done this in bedrooms, living rooms, and even bathrooms (using waterproof strips, of course), and the result always surprises people. It gives you that luxurious, hotel-suite ambiance without any ceiling work whatsoever. The profile itself can be painted to match the wall color, so it virtually disappears.
Another application is mounting LED profiles directly on the ceiling surface in geometric patterns—squares, rectangles, or custom shapes. This turns your lighting into a design feature rather than just a functional element.
Pendant and Suspended Fixtures
Pendant lights hang down from the ceiling on a cord, chain, or rod, and they’re one of the most versatile options for surface light installation without false ceiling. You don’t need a false ceiling to hang a pendant—you just need a ceiling box properly anchored to a joist or beam .
I use pendants most often over kitchen islands, dining tables, and in entryways where you want a statement piece. The key measurement to remember is height: pendants should hang 30 to 36 inches above a dining table surface, and about 66 to 72 inches above the floor in an entryway .
For homes with high ceilings—10 feet or more—pendants help bring the light down to where people actually are, rather than leaving it stranded up near the ceiling. I’ve installed clusters of small pendants at varying heights in living rooms to create visual interest and ensure the light reaches seating areas effectively .
Tools and Materials You’ll Need for Surface Light Installation
Before we get into the step-by-step installation process, let me run through the tools and materials I bring to every surface light installation job. If you’re planning to DIY any part of this, having the right tools makes all the difference between a professional-looking result and something that looks like an amateur attempt.
Essential Tools
Stud finder – This is non-negotiable. Whether you’re mounting to drywall, plaster, or wood, you need to know where the joists or studs are. I prefer electronic stud finders that can detect both wood and metal, and some models even detect live wiring behind the wall, which is a nice safety feature .
Voltage tester – Never, and I mean never, start any electrical work without confirming the power is off. I use a non-contact voltage tester that beeps and lights up when it detects live current. It’s the first thing I pull out of my bag on every job.
Power drill with assorted bits – You’ll need this for drilling pilot holes and driving screws. Make sure you have masonry bits if you’re working with concrete or brick ceilings, and wood bits for joist mounting.
Screwdrivers – Both flathead and Phillips, in various sizes. Many modern fixtures use hex-head screws, so an Allen wrench set is useful too.
Wire strippers – For preparing the ends of wires for connection. Don’t use a knife or your teeth—get proper strippers.
Wire connectors (wire nuts) – These twist-on connectors join wires together safely. I always use the right size for the wire gauge I’m working with.
Measuring tape and level – For marking accurate placement and ensuring your fixture hangs straight. A crooked light fixture is one of those things that drives homeowners crazy every time they look at it.
Ladder – Make sure it’s tall enough and rated for your weight plus any tools you’re carrying. I can’t tell you how many close calls I’ve seen from people using wobbly step stools.
Pencil and painter’s tape – For marking positions without leaving permanent marks on walls or ceilings.
Materials
Mounting hardware – This varies by ceiling type. For drywall, you’ll need toggle bolts or anchors rated for the fixture weight. For concrete, you’ll need masonry screws and plastic anchors or lead shields. For wood joists, wood screws are usually sufficient .
Electrical wire – If you’re running new circuits or extending existing ones, use the appropriate gauge wire (typically 14-gauge for 15-amp circuits, 12-gauge for 20-amp circuits in residential applications).
Junction boxes – Every electrical connection needs to happen inside an approved junction box. If your existing box isn’t rated for the weight of your new fixture, you may need to upgrade to a fan-rated or heavy-duty box.
Surface-mounted conduit or raceways – If you need to run new wiring across the ceiling surface, these protect the wires and keep things looking neat. They come in plastic and metal varieties, and you can paint them to match your ceiling .
Step-by-Step Guide to Surface Light Installation Without False Ceiling
Now let’s get into the actual installation process. I’m going to walk you through installing a surface-mounted LED panel light because it’s the most common request I get, but the principles apply to most surface-mounted fixtures. I’ll note where other fixture types differ.
Step 1: Plan Your Layout
Before you touch a single tool, you need a plan. I always start by sketching the room on paper and marking where furniture will sit, where people will walk, and where tasks will happen. Lighting isn’t just about brightness—it’s about how the light serves the people in the space.
For general ambient lighting with surface-mounted panels, I follow a simple rule: divide the room into a grid and place fixtures at the intersections. In a rectangular room, one central panel often works for spaces up to about 150 square feet. For larger rooms, I use multiple panels spaced evenly.
If you’re combining different types of lights—say, surface panels for ambient light and track lighting for accent—think about layers. The ambient layer provides overall brightness, the task layer focuses on work areas, and the accent layer highlights features or creates mood.
Step 2: Turn Off the Power
This cannot be overstated. Go to your electrical panel and turn off the breaker that controls the circuit you’ll be working on. Don’t just flip the wall switch—switches can fail, wires can be mislabeled, and you don’t want to find out the hard way.
After turning off the breaker, use your voltage tester at the existing fixture location to confirm there’s no power. Test every wire—black (hot), white (neutral), and bare copper (ground). Only when you’re 100% certain the power is off do you proceed.
Step 3: Remove the Existing Fixture
If you’re replacing an old light, carefully remove the fixture body and disconnect the wires. Most fixtures have a mounting strap or crossbar attached to the ceiling box with screws. Remove these and set everything aside.
Inspect the existing ceiling box. Is it securely attached to a joist or brace? Is it rated for the weight of your new fixture? Surface-mounted LED panels are relatively light—usually 5 to 10 pounds—but if you’re installing a heavy chandelier or multiple fixtures on one box, you might need to upgrade to a fan-rated box that can handle 50 pounds or more.
Step 4: Mark and Prepare the Mounting Location
Hold the mounting bracket or base plate of your new fixture against the ceiling where you want it. Use a pencil to mark the screw holes. If you’re mounting to drywall and can’t hit a joist, you’ll need to install anchors.
For drywall mounting without a joist, I use toggle bolts for heavier fixtures or plastic expansion anchors for lighter ones. Drill pilot holes at your marks, insert the anchors, and then attach the mounting bracket with screws.
For concrete ceilings—which are common in basements, condos, and industrial-style homes—drill holes with a masonry bit, insert lead shields or plastic anchors, and then drive masonry screws into the bracket . Concrete mounting is solid as a rock once done right, but it requires a hammer drill and some patience.
For wood joist mounting, which is the easiest scenario, simply drive wood screws through the bracket directly into the joist. No anchors needed.
Step 5: Connect the Wiring
This is where things get serious, and if you’re not comfortable working with electrical wiring, this is the point where you should call a licensed electrician. Electrical work is not the place to learn by trial and error.
Assuming you’re working with standard 120V residential wiring in the United States, you’ll typically have three wires to connect:
- Black wire from ceiling to black wire from fixture (hot)
- White wire from ceiling to white wire from fixture (neutral)
- Bare copper or green wire from ceiling to green or bare wire from fixture (ground)
Use wire nuts to make these connections, twisting them on until they’re tight, and then give each connection a gentle tug to make sure it’s secure. Never leave bare wire exposed outside the wire nut.
If your home has older wiring—knob-and-tube or aluminum wiring—stop right here and call a professional. These systems require special handling and are not DIY-friendly.
Step 6: Attach the Fixture
Once the wiring is connected and tucked neatly into the junction box, attach the fixture body to the mounting bracket. For surface-mounted LED panels, this usually involves sliding the panel onto clips or screwing it into place . For semi-flush mounts, you might attach the canopy first and then the shade. For track lighting, you mount the track to the bracket and then install the heads.
Make sure everything is level and secure. A loose fixture is not just an eyesore—it’s a safety hazard.
Step 7: Install Light Bulbs and Test
If your fixture uses replaceable bulbs, install them now. Many modern surface-mounted LED panels have integrated LEDs that don’t require separate bulbs, which is one less thing to worry about.
Turn the power back on at the breaker and test the light. If it doesn’t work, turn the power back off and check your connections. Common issues include loose wire nuts, reversed hot and neutral wires, or a faulty fixture (rare, but it happens).
Step 8: Clean Up and Admire Your Work
Remove any painter’s tape, clean fingerprints off the fixture, and step back to see the result. There’s nothing quite like the satisfaction of a well-installed light transforming a room.
Handling Wiring Without a False Ceiling: The Real Challenge
Here’s where a lot of homeowners get stuck, and it’s the question I get asked most often: “What do I do about the wiring if I don’t have a false ceiling to hide it in?”
It’s a valid concern. In a false ceiling, all the wiring runs in the space between the original ceiling and the drop ceiling, completely hidden from view. Without that cavity, your wiring has to go somewhere visible—or does it?
Option 1: Surface-Mounted Conduit and Raceways
This is the most common solution, and it’s more attractive than you might think. Surface-mounted conduit is a channel or tube that attaches to your ceiling surface and contains the electrical wiring inside .
Modern raceways come in slim profiles and various finishes—white, black, metallic, wood-grain. You can run them along the edges of the ceiling where walls meet ceiling, which makes them far less noticeable than running wires across the middle of the room. In many cases, a painted raceway blends in so well that visitors don’t even notice it.
I typically use raceways when I need to extend a circuit to a new fixture location without opening up the ceiling. For example, if a living room has one central ceiling box but the homeowner wants two surface-mounted panels for better coverage, I’ll run a raceway from the existing box to the new location.
Option 2: Crown Molding Integration
This is one of my favorite tricks for older homes with character. If you have or plan to install crown molding, you can run low-voltage wiring or even standard electrical cable behind the molding where it meets the ceiling. This requires a bit of carpentry skill to notch the molding or create a channel, but the result is completely hidden wiring.
I’ve used this technique to install LED strip lighting in the cove created by crown molding, giving rooms a beautiful indirect glow with zero visible wiring.
Option 3: Existing Wall and Ceiling Cavities
Sometimes, the best path for new wiring isn’t across the ceiling at all—it’s down through the walls. If you have an unfinished basement below or an attic above, you can often fish new wires through wall cavities and bring them out at ceiling level where you need them.
This requires cutting small access holes in the drywall, fishing the wire through, and then patching and painting. It’s more work than surface raceways, but the result is completely invisible wiring.
Option 4: Wireless and Battery-Powered Options
For accent lighting or situations where running wire is truly impractical, don’t overlook modern wireless solutions. Rechargeable LED fixtures, battery-powered motion-sensor lights, and smart bulbs that screw into existing sockets can all supplement your lighting without any new wiring .
I don’t recommend these as your primary lighting solution—they’re not bright enough for general illumination—but they’re fantastic for under-cabinet lighting, closet lighting, or adding accent lights in tricky spots.
Room-by-Room Surface Light Installation Without False Ceiling
Every room in your home has different lighting needs, and after fifteen years of installations, I’ve developed some strong opinions about what works where. Let me break it down room by room.
Living Room
The living room is where you relax, entertain, watch TV, read, and maybe even work from home occasionally. It needs layered lighting—no single fixture can do it all.
For surface light installation without false ceiling in a living room, I typically recommend a combination approach:
- Primary ambient light: One or two surface-mounted LED panels, depending on room size. For a 200-square-foot living room, two 24W panels spaced evenly provide excellent general illumination.
- Accent lighting: Wall sconces mounted 5.5 to 6.5 feet high on side walls create beautiful reflected light and eliminate dark corners . Choose up-down designs that wash light both upward and outward.
- Task and mood lighting: Floor lamps with fabric shades in corners beside seating areas, and perhaps a table lamp on a side table for reading.
If you have artwork or architectural features you want to highlight, add a section of track lighting aimed at those elements. The track mounts directly to the ceiling surface and gives you complete control over what gets lit and what doesn’t.
Kitchen
Kitchens are task-heavy spaces where you need bright, shadow-free light for food preparation. But they also need ambient light for general use and accent light to make the space feel welcoming.
For surface light installation without false ceiling in kitchens:
- Primary lighting: Two to three surface-mounted LED panels, depending on kitchen size. A 24W panel over the main work area and an 18W panel over the dining or seating area is a common configuration.
- Task lighting: Under-cabinet LED strips are essential for countertop illumination. These mount to the underside of wall cabinets and plug into an outlet or hardwire into the cabinet lighting circuit.
- Accent lighting: If you have a kitchen island, consider two or three pendant lights hung at 30 to 36 inches above the countertop. The pendants add style and focused task light right where you need it.
One mistake I see homeowners make is using only one central ceiling fixture in the kitchen. That creates harsh shadows on your work surfaces and leaves corners dark. Multiple light sources from different angles eliminate shadows and make the kitchen safer and more pleasant to work in.
Bedroom
Bedrooms need soft, warm light that promotes relaxation. The color temperature matters here more than in any other room—stick to 2700K to 3000K for that cozy, calming glow .
For surface light installation without false ceiling in bedrooms:
- Primary lighting: One surface-mounted LED panel in the center of the room, 18W to 24W depending on size. Choose a dimmable panel so you can lower the brightness for evening wind-down time.
- Bedside lighting: Wall sconces on either side of the bed, mounted at a height where the light doesn’t shine directly in your eyes when you’re lying down. I like swing-arm sconces that you can adjust for reading.
- Ambient accent: LED strip lighting behind the headboard creates a beautiful, indirect glow that turns the bed into a focal point. This is low-voltage wiring that can often be hidden behind furniture.
- Closet lighting: A small surface-mounted fixture or battery-powered motion-sensor light inside the closet.
Always install a two-way switch near the bed so you can turn off the ceiling light without getting up. It’s a small detail that makes a huge difference in daily comfort.
Bathroom
Bathrooms need bright, even light for grooming tasks, but they also need to be safe. All electrical fixtures in bathrooms must be rated for damp or wet locations depending on their placement.
For surface light installation without false ceiling in bathrooms:
- Vanity lighting: Wall sconces on either side of the mirror at face height provide the most flattering, shadow-free light for shaving and makeup. Avoid placing a single light above the mirror—that creates shadows under your eyes and chin.
- General lighting: One surface-mounted LED panel, 18W, rated for damp locations.
- Shower lighting: If your shower area needs light, use a fixture specifically rated for wet locations. Surface-mounted waterproof LED panels are available for this application.
Hallways and Entryways
These transitional spaces often get neglected, but they’re the first impression of your home and need to be well-lit for safety.
For surface light installation without false ceiling in hallways:
- Spacing: Place surface-mounted fixtures every 8 to 10 feet along the hallway length. For a more modern look, use a linear run of surface-mounted downlights in a straight line.
- Entryway: A semi-flush mount fixture or a small chandelier (if ceiling height allows) creates a welcoming focal point. Add wall sconces on either side of the front door for symmetry and additional brightness.
Basement
Basements are where surface light installation without false ceiling really shines—pun intended. Most basements have low ceilings, exposed joists, concrete ceilings, or some combination thereof. A false ceiling would eat up precious headroom.
For basements:
- Exposed joist ceilings: Surface-mounted LED panels or strip lights can attach directly to the bottom of joists. I often run LED strips along the sides of joists for indirect lighting that makes the ceiling feel higher.
- Concrete ceilings: Surface-mounted panels with masonry anchors work perfectly. If the concrete is painted white, the reflected light helps brighten the entire space.
- Track lighting: Great for basements used as multipurpose spaces—home gyms, playrooms, workshops—because you can adjust the light direction as the room’s use changes.
Ceiling Types and How They Affect Installation
Not all ceilings are created equal, and the type of ceiling you’re working with determines your installation approach. Here’s what I’ve learned about each common ceiling type.
Drywall Ceilings
Drywall is the most common ceiling material in modern American homes, and it’s the easiest to work with for surface light installation. You can mount directly to drywall using anchors if you don’t hit a joist, or directly into the joist if you do.
The main concern with drywall is weight capacity. Standard drywall anchors hold about 50 pounds, which is plenty for most surface-mounted LED panels but might not be enough for heavy chandeliers or multiple fixtures on one bracket. When in doubt, find the joist and mount to that.
Plaster Ceilings
Plaster is common in homes built before the 1950s, and it’s much harder and more brittle than drywall. Drilling into plaster requires a masonry bit and a gentle touch—too much pressure and you’ll crack the plaster.
For surface light installation without false ceiling on plaster, I use plastic anchors designed for masonry or toggle bolts that spread the load across a larger area. Never rely on a simple screw in plaster—it will pull out.
Concrete Ceilings
Concrete ceilings are standard in condos, apartments, basements, and modern industrial-style homes. They’re rock-solid but challenging to drill into .
You’ll need a hammer drill and masonry bits to make holes in concrete. Then insert lead shields or expansion anchors and drive masonry screws into them. The holding power is excellent once installed, but the installation process is more physically demanding than working with drywall.
One tip: concrete dust gets everywhere. Lay down drop cloths, wear a dust mask, and have a vacuum handy.
Exposed Joist Ceilings
Exposed joist ceilings—common in basements and lofts—are actually great for surface light installation. You can mount fixtures directly to the bottom of joists without worrying about finding studs, and wiring can often run along the sides of joists where it’s partially concealed.
For a finished look, I sometimes install a surface-mounted fixture on every other joist bay, creating a rhythmic pattern that looks intentional rather than utilitarian.
Popcorn and Textured Ceilings
Ah, popcorn ceilings—the bane of every electrician’s existence. That bumpy texture makes it hard to get a mounting bracket to sit flat, and it looks terrible if you remove a fixture and leave a smooth circle surrounded by texture.
For surface light installation without false ceiling on popcorn ceilings, I use mounting brackets with a wide footprint that spans the texture bumps. After installation, I recommend that homeowners consider having the ceiling retextured or smoothed if they’re doing a significant lighting update. It’s extra work, but the final result looks so much better.
Color Temperature, Brightness, and Dimming: Getting the Light Quality Right
Installing the fixture is only half the battle. The other half is making sure the light that comes out of it looks good and serves the room’s purpose.
Color Temperature
Color temperature is measured in Kelvin (K), and it determines whether your light looks warm and cozy or cool and clinical.
- 2700K to 3000K: Warm white. This is what I recommend for living rooms, bedrooms, dining rooms, and any space where you want to relax. It mimics the warm glow of traditional incandescent bulbs.
- 3500K to 4000K: Neutral white. Good for kitchens, bathrooms, home offices, and workshops where you need clear, accurate light for tasks.
- 5000K to 6500K: Cool white or daylight. I rarely use these in residential settings unless specifically requested. They can feel harsh and clinical, like a hospital or warehouse .
Most of my clients prefer 3000K for general living spaces and 4000K for kitchens and bathrooms. It’s a safe, versatile combination.
Brightness (Lumens)
Wattage used to be how we measured light bulb brightness, but with LEDs, wattage only tells you how much power the bulb uses—not how much light it produces. Lumens are the correct measurement.
Here’s my rough guide for room brightness:
- Living room: 1,500 to 3,000 lumens total, depending on room size
- Bedroom: 1,000 to 2,500 lumens
- Kitchen: 2,000 to 4,000 lumens (you want it bright for safety)
- Bathroom: 1,500 to 3,000 lumens
- Hallway: 500 to 1,500 lumens, depending on length
Higher ceilings need more lumens because the light has to travel farther to reach your work surfaces. A room with 10-foot ceilings needs about 25% more light than the same room with 8-foot ceilings.
Dimming
I always recommend installing dimmer switches, especially in living rooms, bedrooms, and dining rooms. The ability to adjust brightness transforms a room from bright and functional to soft and intimate with the slide of a switch.
Not all LED fixtures are dimmable, so check the packaging before you buy. And not all dimmer switches work with all LED fixtures—older TRIAC dimmers designed for incandescent bulbs can cause LEDs to flicker or buzz . If you’re installing new LED fixtures, invest in LED-compatible dimmers. They’re worth every penny.
Cost Breakdown: What Surface Light Installation Without False Ceiling Actually Costs
Let me give you real numbers based on my experience working in the US market. These are ballpark figures for materials and labor, and they’ll vary by region—expect to pay more in major metropolitan areas and less in rural regions.
DIY Costs (Materials Only)
| Item | Cost Range |
|---|---|
| Surface-mounted LED panel (18W-24W) | $30 – $80 each |
| Surface-mounted LED panel (36W+) | $60 – $150 each |
| Semi-flush mount fixture | $40 – $200 |
| Surface-mounted downlight (cylinder) | $25 – $75 each |
| Track lighting system (6-foot track with 3 heads) | $100 – $300 |
| LED strip kit (16 feet with power supply) | $30 – $80 |
| Wall sconce | $40 – $150 each |
| Pendant light | $50 – $300 each |
| Dimmer switch (LED-compatible) | $20 – $50 |
| Wire, connectors, raceways, hardware | $20 – $50 per fixture |
Professional Installation Costs
If you hire a licensed electrician (which I strongly recommend for any work involving new circuit runs or panel connections), labor typically runs $75 to $150 per hour, with most fixture installations taking 1 to 3 hours depending on complexity.
A typical surface light installation without false ceiling for a single fixture replacement might cost $150 to $300 total (fixture + labor). A whole-room installation with multiple fixtures, new switches, and wiring could run $800 to $2,500 depending on the scope.
Compare that to false ceiling installation: $8 to $24 per square foot for the ceiling itself, plus the cost of the lights, plus the cost of installing the lights. For a 200-square-foot room, you’re looking at $1,600 to $4,800 before you even buy a single fixture. Surface mounting saves you that entire expense.
Safety Considerations and Code Compliance
I can’t write this guide without talking about safety. Electrical work is dangerous if done incorrectly, and building codes exist to keep you and your family safe.
When to Call a Professional
I’m a big believer in DIY for many home projects, but electrical work has boundaries. Call a licensed electrician if:
- You need to run new circuits from your electrical panel
- Your home has aluminum wiring or knob-and-tube wiring
- You’re working in a bathroom or other wet location
- You need to upgrade your electrical panel capacity
- You don’t feel confident in your ability to work safely with electricity
The cost of professional installation is always less than the cost of a house fire or electrocution.
Code Requirements
In the United States, electrical work must comply with the National Electrical Code (NEC) and any local amendments. Key requirements for surface light installation include:
- All connections must be made inside approved junction boxes
- Junction boxes must be accessible (you can’t bury them behind drywall)
- Grounding is required for all fixtures
- Bathroom fixtures must be rated for damp or wet locations depending on zone
- Circuit capacity must not be exceeded
Always pull permits for electrical work when required by your local jurisdiction. Yes, it’s a hassle, but it ensures the work is inspected and safe.
Working with Concrete Ceilings
Concrete ceilings present unique challenges beyond just drilling difficulty. Concrete traps heat, and without a false ceiling cavity for air circulation, fixtures can overheat if not properly rated . Always choose fixtures designed for surface mounting on solid ceilings, and ensure adequate clearance around the fixture for heat dissipation.
Common Mistakes to Avoid
After fifteen years, I’ve seen every mistake in the book. Here are the ones I see most often with surface light installation without false ceiling:
Using only one light source. A single ceiling fixture in the center of the room creates harsh shadows and leaves corners dark. Layer your lighting with multiple sources at different heights and positions.
Choosing the wrong color temperature. That 6000K “daylight” bulb might seem bright and efficient, but in a living room or bedroom, it feels sterile and unwelcoming. Stick to warm white (2700K-3000K) for living spaces .
Ignoring glare. Surface-mounted fixtures sit below the ceiling plane, which means you can sometimes see the light source directly from certain angles. Choose fixtures with diffusers or frosted covers to minimize glare.
Poor spacing. Fixtures too close together create bright spots; too far apart creates dark spots. Follow the spacing guidelines for your specific fixture type.
Forgetting about dimming. Once you have dimmers, you’ll wonder how you ever lived without them. Install dimmable fixtures and compatible dimmer switches from the start.
Cheap LED strips. Those $10 LED strip kits from the discount store will fail within a year, and the color consistency is terrible. Invest in quality LED products from reputable manufacturers.
Maintenance and Longevity
One of the great things about surface-mounted LED fixtures is how little maintenance they require. LED panels typically last 25,000 to 50,000 hours—that’s 15 to 20 years of normal residential use .
For cleaning, simply dust the fixture surface regularly and wipe it with a damp cloth when needed. Never use abrasive cleaners that could scratch the diffuser.
If a fixture does fail, surface-mounted units are much easier to replace than recessed fixtures. You don’t have to cut into the ceiling or patch drywall—just disconnect the old fixture and mount the new one in the same location.
Final Thoughts: Why Surface Light Installation Without False Ceiling Makes Sense
I’ve installed thousands of lights in hundreds of homes, and I can tell you with complete confidence that surface light installation without false ceiling is a viable, attractive, and often superior option for most residential lighting projects. You save money, you keep your ceiling height, you preserve architectural character, and you get beautiful, functional light.
The key is choosing the right fixtures for your space, planning your layout thoughtfully, and either doing the work safely yourself or hiring a professional who knows what they’re doing. Modern surface-mounted lighting has evolved far beyond the bulky, utilitarian fixtures of the past. Today’s options are slim, stylish, and versatile enough to work in any design aesthetic.
Whether you’re updating a single room or lighting an entire home, don’t let the lack of a false ceiling limit your vision. With the right approach, your existing ceiling can become the foundation for a lighting design that’s every bit as beautiful and functional as anything a drop ceiling could provide—often more so.
If you’re in the planning stages of a lighting project, take the time to visit a lighting showroom and see these fixtures in person. Photos don’t do justice to how sleek a half-inch-thick LED panel looks when it’s actually mounted on a ceiling. Talk to a local electrician about your specific ceiling type and wiring situation. And most importantly, trust your instincts about what looks good in your space.
Good lighting transforms a house into a home. It makes spaces feel larger, warmer, more welcoming, and more functional. And you absolutely do not need a false ceiling to achieve it.
This guide is intended for informational purposes. Always consult with a licensed electrician and follow local building codes for any electrical installation work. Electrical work can be dangerous and should only be performed by qualified professionals if you are not experienced and confident in your abilities.
About the Author: I’m a licensed master electrician based in the United States with over fifteen years of experience in residential and light commercial electrical work. I’ve installed lighting in everything from historic brownstones to modern condos, and I believe that good lighting should be accessible to every homeowner, regardless of their ceiling type or budget.