Introduction
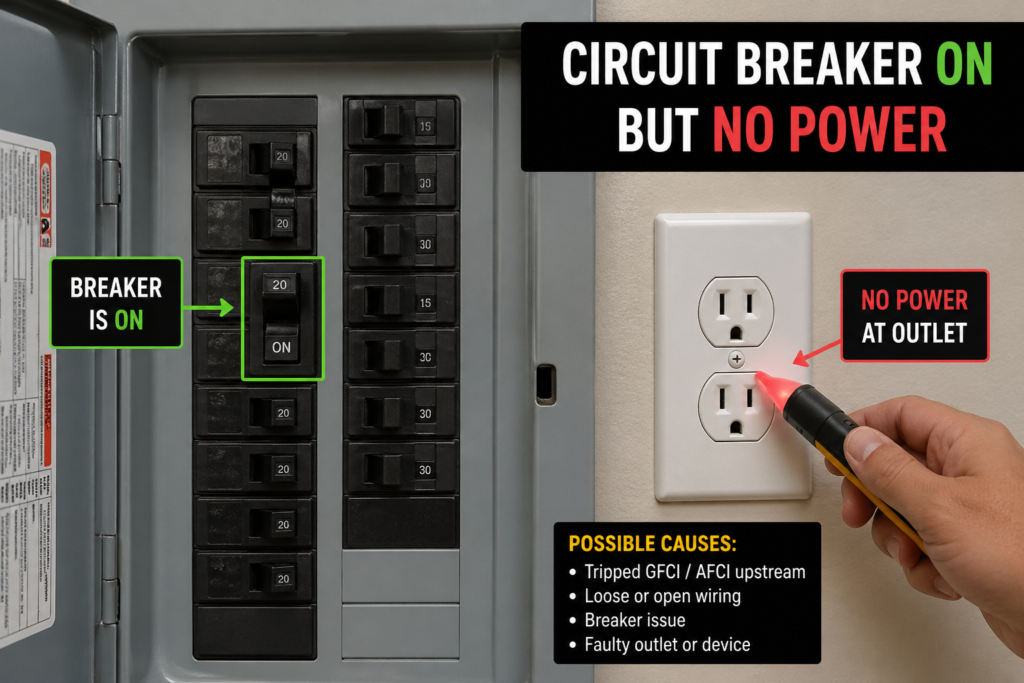
Few electrical problems are as perplexing as flipping a circuit breaker to the “on” position only to discover that the outlets, lights, or appliances on that circuit remain completely dead. Unlike a breaker that trips and refuses to reset, a circuit breaker on but no power scenario suggests a different category of electrical fault—one that can range from a simple tripped GFCI outlet to a dangerous loose connection inside your walls. This guide walks American homeowners through every possible cause, from the most common and harmless to the most serious and potentially hazardous.
Understanding why power disappears despite an engaged breaker is critical not only for restoring electricity but for preventing fires, shocks, and expensive damage to your home’s electrical infrastructure.
Understanding How a Circuit Breaker Works
Before diagnosing why power is absent, it helps to understand what a breaker actually does. A circuit breaker is an automatic electrical switch designed to protect a circuit from damage caused by excess current from an overload or short circuit. When functioning correctly, it monitors the flow of electricity and interrupts that flow when it detects a fault.
However, a breaker in the “on” position does not guarantee that electricity is actually reaching your outlets. The breaker is merely the gatekeeper. Between the breaker and your devices lies an entire network of wires, outlets, switches, junction boxes, and connections—any of which can fail while the breaker itself remains perfectly functional.
The Difference Between a Tripped Breaker and a Breaker With No Output
Many homeowners confuse these two scenarios. A tripped breaker has detected a fault and physically moved to a middle or “off” position to stop current flow. A breaker that is on but producing no power has not detected a fault sufficient to trip it, yet electricity is not reaching the circuit’s endpoints.
| Scenario | Breaker Position | Likely Cause |
|---|---|---|
| Tripped breaker | Middle or “off” | Overload, short circuit, ground fault |
| Breaker on, no power | Fully “on” | GFCI trip, bad breaker, loose wiring, outlet failure |
| Half-power circuit | “on” | Multi-wire branch circuit issue, neutral problem |
This distinction is crucial because the troubleshooting steps differ significantly.
Immediate Safety Steps When You Discover No Power
When you realize a circuit breaker on but no power is affecting your home, take these safety precautions before investigating further:
- Do not assume the circuit is dead — use a non-contact voltage tester before touching any wires
- Unplug all devices on the affected circuit to eliminate potential load issues
- Check for burning smells, warm outlets, or buzzing sounds — these indicate dangerous arcing
- Turn off the breaker if you suspect a wiring fault, until a professional can inspect it
- Never remove the panel cover unless you are qualified and have proper safety equipment
Cause 1: The Hidden GFCI Trip
The most common reason for a circuit breaker on but no power is a tripped Ground Fault Circuit Interrupter (GFCI) outlet or breaker. GFCIs are required by the National Electrical Code in bathrooms, kitchens, garages, basements, laundry rooms, and outdoor areas. A single GFCI can protect multiple standard outlets downstream on the same circuit.
How a GFCI Works
A GFCI monitors the current flowing through the hot and neutral wires. If it detects even a tiny imbalance (as small as 4-6 milliamps), indicating that current is leaking to ground—perhaps through water or a person’s body—it trips almost instantly to prevent electrocution.
Why This Causes “Breaker On But No Power”
The standard circuit breaker in your panel does not trip because no overload or short circuit has occurred. The GFCI outlet or breaker has simply opened the circuit to prevent a ground fault. From the main panel’s perspective, everything looks normal.
How to Identify and Reset a Tripped GFCI
- Locate all GFCI outlets on the affected circuit (look for the “TEST” and “RESET” buttons)
- Press the “RESET” button firmly — you should hear or feel a click
- If the GFCI won’t reset, unplug everything from the protected outlets and try again
- If it still won’t reset, the GFCI outlet itself may be faulty and need replacement
- Check the main panel — some circuits are protected by GFCI breakers rather than outlets; these have a test button on the breaker itself
Common GFCI Locations to Check
- Bathroom outlets (often the outlet nearest the sink)
- Kitchen outlets (especially those near the sink or countertop)
- Garage outlets
- Outdoor outlets and porch lights
- Basement outlets
- Laundry room outlets
- Crawl space outlets
Cause 2: A Faulty or “Dead” Circuit Breaker
Circuit breakers are mechanical devices with internal contacts, springs, and latches. Over time, these components can wear out, corrode, or fail completely. A breaker may appear to be in the “on” position while its internal contacts have failed to close or have burned open.
Signs of a Bad Breaker
- The breaker feels loose or wobbly in the panel
- You hear a buzzing or humming sound from the breaker
- The breaker or the wire connected to it is warm or hot
- The breaker trips frequently for no apparent reason
- Other breakers in the panel work fine, but this one consistently produces no power
Testing a Breaker With a Multimeter
Warning: This procedure involves exposure to live electrical components. Hire a professional if you are not qualified.
- Set your multimeter to AC voltage (200V range or higher)
- Carefully touch one probe to the terminal screw on the suspect breaker
- Touch the other probe to the neutral bar in the panel
- A reading of approximately 120V indicates the breaker is outputting power
- A reading of 0V indicates a faulty breaker
Replacing a Faulty Breaker
If testing confirms the breaker is dead, replacement is necessary. Ensure you purchase an identical breaker—same manufacturer, amperage rating, and type (standard, GFCI, or AFCI). Never substitute a different brand or rating, as this can create serious safety hazards.
Cause 3: Loose or Disconnected Wiring Connections
Electrical connections can loosen over time due to thermal expansion and contraction, vibration, improper installation, or corrosion. A loose connection creates resistance, which generates heat and can eventually interrupt the flow of electricity entirely.
Common Locations for Loose Connections
- Inside the electrical panel: The wire may have worked free from the breaker’s terminal screw
- Junction boxes: Wire nuts may have loosened, or wires may have pulled out
- Outlet and switch boxes: Backstabbed connections (wires pushed into holes rather than wrapped around screws) are notorious for failing
- Light fixture boxes: Connections can degrade due to heat from the fixture
The Danger of Loose Connections
Loose connections are among the leading causes of residential electrical fires. The resistance at a poor connection generates significant heat, which can ignite surrounding materials. If you suspect a loose connection, turn off the breaker and call a licensed electrician.
Cause 4: A Tripped or Faulty AFCI Breaker
Arc Fault Circuit Interrupter (AFCI) breakers, required in most modern homes for bedroom and living area circuits, detect dangerous arcing conditions. Unlike standard breakers, AFCI breakers have sophisticated electronics that can trip for reasons that are not immediately obvious.
Why AFCI Breakers Trip With No Obvious Fault
- Normal appliance arcing: Vacuum cleaners, motors, and fluorescent lights can produce harmless arcing that AFCI breakers misinterpret
- Damaged appliance cords: Frayed cords can create intermittent arcing
- Loose connections in the circuit: These create the exact arcing signatures AFCI breakers are designed to detect
- Shared neutrals: In older wiring, shared neutral wires can confuse AFCI electronics
AFCI Breaker Indicators
Many modern AFCI breakers have small LED indicators that flash specific patterns to indicate why they tripped. Consult your breaker’s documentation to interpret these codes. Common indicators include:
| Flash Pattern | Meaning |
|---|---|
| No flash | Standard overload or short circuit trip |
| 1 flash | Arcing detected |
| 2 flashes | Ground fault detected (on combination AFCI/GFCI breakers) |
| 5 flashes | Overheating or self-test failure |
If an AFCI breaker repeatedly trips or refuses to deliver power, the problem may be in the wiring rather than the breaker itself.
Cause 5: Multi-Wire Branch Circuit (MWBC) Failures
In some homes, particularly those built between the 1960s and 1990s, electricians used multi-wire branch circuits to save on wiring costs. These circuits share a neutral wire between two hot wires on different phases. While code-compliant when installed correctly, MWBCs can produce confusing symptoms when they fail.
How MWBC Failures Manifest
If the shared neutral connection becomes loose or disconnected:
- One circuit may lose power entirely while the other appears normal
- You may measure 240V between the two hot wires instead of 120V to neutral
- Outlets and lights on one half of the circuit go dead while the breaker remains on
Identifying an MWBC Problem
MWBCs should be connected to a double-pole breaker or two single-pole breakers with a handle tie. If you find two breakers with a shared neutral wire, do not attempt to diagnose or repair this yourself. MWBC issues require professional attention due to the risk of overloading the neutral wire and creating fire hazards.
Cause 6: Damaged or Worn-Out Outlets and Switches
Standard outlets and switches have a finite lifespan. The internal metal components that grip plug prongs or make contact when a switch is flipped can wear out, corrode, or break. When this happens, electricity cannot pass through even though the breaker is on and the wiring leading to the box is intact.
Signs of Outlet or Switch Failure
- Plugs fall out of the outlet easily (worn contacts)
- The outlet or switch feels warm
- You see burn marks, melting, or discoloration
- The switch makes a crackling sound when flipped
- Only one outlet in a string works while others are dead
The Daisy-Chain Problem
In most residential wiring, outlets are wired in a “daisy chain”—power flows from the panel to the first outlet, then to the second, then to the third. If an outlet in the middle of the chain fails, all outlets downstream will lose power. The breaker remains on because no fault has occurred; the circuit is simply open at the failed outlet.
Testing for a Failed Outlet
- Turn off the breaker
- Remove the outlet cover plate
- Use a multimeter to test voltage at the outlet’s terminal screws
- If voltage is present at the terminals but the outlet doesn’t work, the outlet itself is faulty
- If no voltage is present, the problem is upstream in the wiring
Cause 7: Rodent Damage to Wiring
Rodents, particularly mice and squirrels, chew on electrical wiring. This behavior can sever a hot wire, a neutral wire, or both, interrupting power to part or all of a circuit. Because the wire is simply broken rather than shorted, the breaker may not trip.
Where to Look for Rodent Damage
- Attics and crawl spaces
- Basements and utility rooms
- Behind appliances (refrigerators, dishwashers, ovens)
- Garages and sheds
- Outdoor wiring in conduit
Signs of Rodent Activity Near Wiring
- Droppings near electrical boxes or panel
- Chewed insulation or wood near wiring runs
- Nesting materials (paper, fabric, insulation) in junction boxes
- Intermittent power loss that improves or worsens with temperature changes
The Fire Risk
Rodent-damaged wiring is extremely dangerous. Chewed insulation exposes conductors, creating the risk of short circuits, arcing, and fires. If you suspect rodent damage, turn off the breaker and call an electrician immediately.
Cause 8: Water Damage and Moisture Intrusion
Water and electricity do not mix. Moisture inside an outlet box, junction box, or the electrical panel itself can cause corrosion, short circuits, or simply interrupt the flow of electricity.
Common Sources of Water Intrusion
- Roof leaks dripping into wall cavities
- Plumbing leaks affecting electrical boxes
- Condensation in basements and crawl spaces
- Flooding or high humidity
- Outdoor outlets without proper weatherproof covers
What Water Damage Looks Like
- Rust or corrosion on outlet screws and terminals
- Mineral deposits (white or green powder) on connections
- Discolored or swollen outlet covers
- A musty smell near electrical boxes
Immediate Action
If you discover water in or near electrical components, turn off the main breaker immediately. Do not attempt to restore power until a licensed electrician has inspected and repaired the damage.
Cause 9: Backstabbed Outlet Connections
From the 1970s through the 1990s, many electricians and DIYers used “backstab” or “push-in” connections on outlets. These connections involve pushing a stripped wire into a small hole in the back of the outlet, where a spring-loaded clamp grips it. While faster than wrapping wires around terminal screws, backstab connections are notoriously unreliable.
Why Backstab Connections Fail
- The spring clamp weakens over time
- Thermal cycling causes the wire to expand and contract, loosening the grip
- Vibration from nearby appliances can work the wire free
- The small contact area creates resistance and heat, accelerating failure
Identifying Backstabbed Outlets
Remove the outlet cover and look at the back of the device. If you see wires pushed into small round holes with no visible screw connection, you have backstabbed outlets. The recommended repair is to remove the wires from the backstab holes and reconnect them to the side terminal screws, or better yet, replace the outlet entirely.
Cause 10: Faulty Light Fixtures and Ceiling Fans
Sometimes the problem is not the breaker, the wiring, or the outlet, but the device itself. A failed light fixture or ceiling fan can create an open circuit that prevents power from reaching other devices on the same circuit.
How a Failed Fixture Kills the Circuit
In many wiring configurations, power flows to the light fixture first, then continues to outlets or other lights. If the fixture’s internal wiring fails or the fixture itself creates a dead short that the breaker doesn’t detect, everything downstream loses power.
Testing Fixture-Related Issues
- Turn off the breaker
- Remove the light fixture or ceiling fan canopy
- Inspect the wire connections in the fixture box
- Disconnect the fixture and cap the wires with wire nuts
- Turn the breaker back on
- If power returns to the rest of the circuit, the fixture is the problem
Step-by-Step Diagnostic Flowchart
Follow this systematic approach to identify why your circuit breaker on but no power:
Step 1: Check All GFCI Outlets
- Locate every GFCI on the circuit
- Press the RESET button on each
- Test power — if restored, the problem is solved
Step 2: Test the Breaker Output
- Use a non-contact voltage tester at the breaker terminal
- If no voltage is present, the breaker is faulty
- If voltage is present, proceed to Step 3
Step 3: Check the First Outlet or Switch in the Circuit
- The first device in the chain is most likely to have a loose connection
- Remove the cover and inspect wire connections
- Look for backstabbed wires, loose wire nuts, or burned terminals
Step 4: Inspect Junction Boxes
- Locate any accessible junction boxes on the circuit
- Check wire nut connections for looseness or corrosion
- Look for signs of overheating (discolored wires, melted insulation)
Step 5: Test Individual Outlets
- Use a receptacle tester or multimeter at each outlet
- Identify where power stops — the problem is between the last working outlet and the first dead one
Step 6: Consider Professional Help
- If you cannot locate the problem after these steps
- If you find burned, melted, or damaged wiring
- If the circuit involves aluminum wiring, multi-wire branch circuits, or complex configurations
When to Call a Licensed Electrician
While some causes of circuit breaker on but no power are simple fixes, others require professional expertise. Call a licensed electrician if:
- You are not comfortable working with electrical components
- The problem involves the main panel or service entrance
- You discover aluminum wiring (common in homes built 1965-1973)
- You find evidence of water damage, rodent damage, or burned wiring
- The circuit is part of a multi-wire branch circuit
- Multiple circuits are affected simultaneously
- You smell burning plastic or see scorch marks
- The problem recurs after you make a repair
Cost Expectations for Professional Repair
| Service | Average Cost (USA) |
|---|---|
| GFCI outlet replacement | $150 – $250 |
| Standard breaker replacement | $150 – $300 |
| Outlet or switch replacement | $100 – $200 |
| Circuit diagnosis and repair | $200 – $500 |
| Junction box repair/replacement | $250 – $600 |
| Rodent damage wiring repair | $300 – $1,500 |
| Partial circuit rewiring | $500 – $2,000 |
| Panel inspection and assessment | $100 – $250 |
Preventing Future “Breaker On But No Power” Issues
Annual Electrical Maintenance Checklist
- [ ] Test all GFCI and AFCI outlets and breakers using the TEST button
- [ ] Visually inspect outlets and switches for discoloration or warmth
- [ ] Check that all outlet cover plates are secure and undamaged
- [ ] Ensure outdoor outlets have weatherproof covers
- [ ] Inspect the electrical panel for rust, moisture, or unusual odors
- [ ] Verify that all breakers are properly labeled
- [ ] Tighten any loose terminal screws (with power off, by a professional)
Upgrade Recommendations
- Replace all backstabbed outlets with screw-terminal or clamp-style outlets
- Install tamper-resistant outlets if you have young children
- Consider upgrading to combination AFCI/GFCI breakers for enhanced protection
- Add dedicated circuits for high-draw appliances to prevent overloads
Understanding Your Home’s Electrical History
Knowing when your home was built and whether it has been renovated can provide valuable clues:
| Era | Common Wiring Issues |
|---|---|
| Pre-1950 | Knob-and-tube wiring, no grounding, overloaded circuits |
| 1950-1965 | Aluminum wiring in some regions, ungrounded outlets |
| 1965-1973 | Aluminum branch circuit wiring (fire hazard if not properly maintained) |
| 1970-1990 | Backstabbed outlet connections, Federal Pacific panels |
| 1990-2008 | Early AFCI requirements, some GFCI nuisance tripping issues |
| 2008-Present | Modern AFCI/GFCI requirements, more reliable equipment |
Conclusion
A circuit breaker on but no power is a puzzle with many possible solutions. While the cause is often as simple as a tripped GFCI outlet, it can also indicate serious issues like failing breakers, loose connections, or damaged wiring. The key is to approach troubleshooting systematically, starting with the easiest and safest checks before moving to more complex diagnostics.
Never ignore persistent electrical problems. What begins as a minor inconvenience can escalate into a fire hazard or electrocution risk. When in doubt, the cost of a professional electrician’s visit is a small price to pay for the safety of your home and family.
This guide is for informational purposes only. Electrical work can be dangerous and potentially fatal. Always consult a licensed electrician before attempting repairs inside an electrical panel or junction box. Ensure all work complies with the National Electrical Code and your local jurisdiction’s requirements.
Target Keywords: Circuit breaker on but no power, breaker on no power, no power but breaker not tripped, outlets not working breaker not tripped, lights not working breaker is on.
ع